Wednesday, March 27, 2013

Easter egg love


Easter came a little early at our house tonight, just for fun. Impulsive me decided to make a decorated egg with a message inside for Mr Crafty. A bit of a comedy of errors but in the end it was lots of fun and all turned out quite nicely.

Here's how it went down.....

I used a drawing pin to put a little hole in this egg.


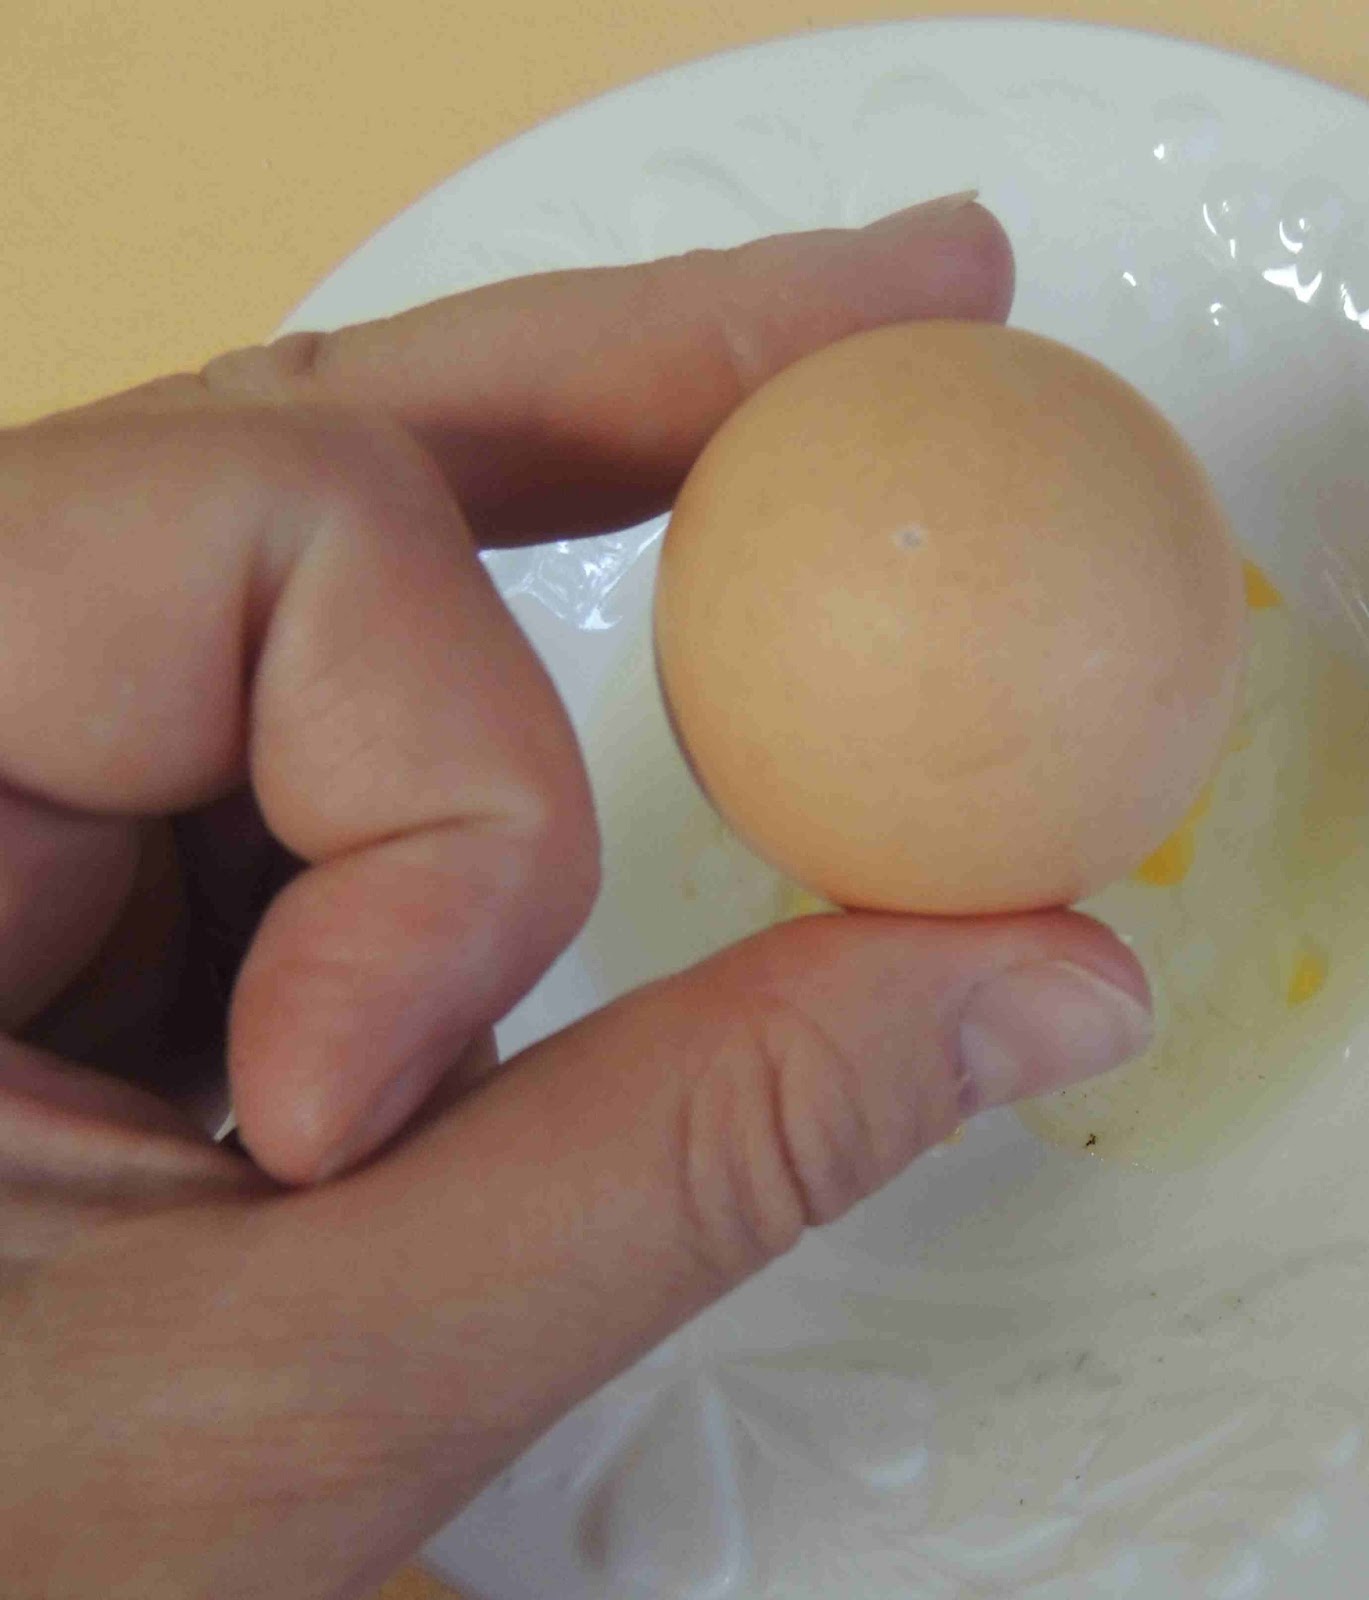
And a bigger one in the other end. Then I blew the yolk and white out from the egg.


Having no idea how to colour eggs, I just went ahead with my usual lack of planning and rolled it around in water and food dye.

It came out looking hideous. Not to mention my hands.


So I decided to paint over the top of that atrocity. Ok, still extremely unattractive.


So I moved on for a bit, to give my brain some breathing space. I found an old envelope, (looks like it has Vegemite on it) and wrote a little love note to Mr Crafty.


Cut it out, rolled it up like a scroll, and popped it inside the egg.


I'd had some time to regroup, so I dragged out some little golden book pages and chopped them up into tiny pieces and then glued them onto the egg.


Starting to look a bit better. Phew! Decided on a glass of red to calm the nerves a bit.


 I wrapped a recycled gift box with some of the book page too. Super cute picture.


Ready to gift.

Mr crafty was intrigued.

And then he was a little bit chuffed.


I think I just made a tough day for someone I love just a little bit more joyous, and that fills my little heart with joy too. If you are having a break over Easter, I hope you have a wonderful rest and relax. 

Monday, March 25, 2013

Converting a tea towel into an apron


My Mum's birthday is this week so I decided to make her this apron using one of the gorgeous Irish linen tea towels my Nan had stashed away in her cupboard.

Step 1 - Find an awesome tea towel.


Step 2 - Get some ribbon (I reclaimed this ribbon from a birthday present wrapping)


 Step 3 - Cut 2 diagonal pieces from the top of the tea towel for the arms.


 Step 4 - Fold the raw edges under and then under again so that the raw edge is hidden. Then sew along the 2 edges. I used a double row of stitching because I think it looks a bit nicer.


Step 4 - Cut your ribbon into three pieces, one piece to go around your neck and one on each side of your waist to tie around your waist. Sew them on as shown below. In the picture above you can see that I used a cross to strengthen the bond where I sewed the ribbon on, just to be sure. I also folded the ribbon under twice before sewing to hide the raw edge of the ribbon (like a hem).


Step 5 - This is an optional step. I'm making it a bit more girly by adding some lace. I gathered the lace a little by sewing 2 rows of stitching along the top and pulling the top threads. Then I sewed this gathered lace to the bottom of the apron to make a frill.


Finished!


The house of Nana


Some of you may know that my Nana passed away recently, and my Mum and her sisters have been taking to the unenviable task of cleaning out the house of someone who lived in the same place, and in much the same way, for 60 plus years. She never threw anything away, and many things are in original or fantastic condition.

Knowing my love of vintage, Mum selected some things I might like to have, and I will be using some of them for upcoming craft projects.

I love these old canisters, I will be finding something very useful to use them for, and the floral tablecloth might be refashioned into something else.

The pink plates I will use for Sunday breakfasts, as they have many memories attached to them of meals at Nanny's house sitting around her laminex table.


I adore these vintage towels, so my mind will be working overtime trying to think of something really special to do with them.


These awesome Irish linen tea towels are so vibrant. They are the subject of today's sewing adventure, blog post to follow.

One of her skirts.

And this was one of my Pa's tops. I'm wearing it today. Love it!


These were also my Pa's overalls which he wore every day. I got these when he died many years ago now, and still wear them occasionally. This was me last week. Still miss him after 19 years and feel a bit closer to him when I wear these.


How lucky I am to have such special memories of all of my grandparents, and it's a privilege to have some of Nan's things and let them see light again after so many years in a dark cupboard.

Do you have special items passed on from loved ones who are no longer around?

Sunday, March 24, 2013

My first blogger meet up


Yesterday I was lucky enough to be invited to my first blogger meet up organised by Erica at Recycled Fashion, with a group of thrifty fashion bloggers in Melbourne. We visited 4 fantastic op shops before stopping for lunch and a lovely cool drink. I had a great time, and couldn't help but visit a couple more op shops on my journey before heading back to Bendigo.

There were some very glamorous op shoppers among us.


Ugly or not?


Here we all are stopping for a hard earned rest.


I picked up a great granny rug for $5, which Mr Crafty is enjoying below.


I also got this vintage house dress. I love the colour and it is ripe for refashioning and in need of a little TLC.


Friday, March 22, 2013

A pile of vintage linen


I'm a bit of a fan of vintage linen, especially floral sheets and pillowcases, so I'm always on the look out for it at op shops. My first project for this blog brings much of this collection together to make a beautiful little skirt for my daughter Juliet.

I started off with this pile. 3 pillowcases, 2 sheets and one doona cover.


I decided to make a shirt with both an over and underskirt, so my first step was to cut 8 panels to make the gores for the 2 skirt pieces. I used 4 different fabrics (sheets) for the underskirt and 2 different fabrics for the overskirt. The overskirt is a little bit fuller and shorter than the underskirt.

Here are all of my cut out jigsaw pieces.


All the panels were then sewn together, and I added some elastic gathering along the length of each panel on the overskirt, by sewing elastic lines along the length of the skirt that were about 1/4 shorter than the skirt fabric.


Here are the 2 skirts, with a little bit of lace and ric rac added to one seam.


And my completed skirt with a yolk (pillowcase) and simple elastic waistband. Of course I couldn't resist adding a great big reclaimed button.